Picking up a crochet hook for the first time can feel intimidating — a tangle of yarn, unfamiliar terms, and hands that don’t quite know what to do. But here’s the good news: crochet is one of the most beginner-friendly crafts out there. You don’t need expensive equipment, a big time commitment, or any prior experience to get started. All it takes is a hook, some yarn, and a willingness to practice a few basic motions until they click.
If you’ve been wondering how to start crochet, this guide breaks the process down into manageable steps — from choosing your first hook and yarn, to mastering the chain stitch, to finishing your very first project. Whether you’re picking up crochet as a relaxing hobby, a creative outlet, or a way to make handmade gifts, you’ll have everything you need to begin with confidence.
Essential Supplies
Before you make your first stitch, it helps to gather a few basic supplies. The good news is that crochet has a low barrier to entry — you don’t need a big investment to get started.
Crochet Hook
A single hook is all you need to begin. For beginners, a size H/8 (5mm) hook is a great starting point — it’s easy to grip and works well with medium-weight yarn, making your stitches simple to see and correct.
Yarn
Choose a light-colored, worsted weight (category 4) yarn for your first projects. Light colors make it much easier to see individual stitches while you’re still learning to recognize what a stitch looks like — dark or highly textured yarns can hide your work and slow down learning.
Scissors
Any small, sharp pair will do. You’ll use these to cut yarn when finishing a project, changing colors, or fixing a mistake.
Yarn Needle
Also called a tapestry needle, this large, blunt needle is used to weave in loose ends once a project is complete, giving your work a clean, finished look.
Optional Extras
- Stitch markers — helpful for marking the beginning of a round or tracking specific stitches
- Row counter — useful for patterns with many repeated rows
- Project bag — keeps your yarn and tools organized and portable
With these basics in hand, you’re ready to learn the foundational techniques that every crochet project builds on.
Understanding Yarn and Hook Sizing
Once you have your basic supplies, it helps to understand how yarn and hook sizes work together — this knowledge will make choosing materials for future projects much easier.
Yarn Weight Categories
Yarn is labeled by “weight,” which refers to its thickness, not how heavy it is. The Craft Yarn Council uses a numbered system from 0 to 7:
- 0 (Lace) — Very thin, used for delicate doilies and shawls
- 1 (Super Fine) — Sock and fingering weight
- 2 (Fine) — Sport weight
- 3 (Light) — DK (double knit) weight
- 4 (Medium) — Worsted weight — the most beginner-friendly option
- 5 (Bulky) — Thick yarn, works up quickly
- 6 (Super Bulky) — Very thick, great for chunky blankets
- 7 (Jumbo) — Extremely thick, often used with arm crochet
For your first projects, stick with category 4 (worsted weight). It’s widely available, affordable, and easy to work with.
Hook Sizing
Crochet hooks are sized using three different systems — US letters/numbers, millimeters, and UK/Canadian sizing — which can be confusing when patterns use different conventions. As a beginner, focus on the millimeter size, since it’s the most universal:
| US Size | Metric (mm) |
|---|---|
| E/4 | 3.5mm |
| F/5 | 3.75mm |
| G/6 | 4mm |
| H/8 | 5mm |
| I/9 | 5.5mm |
| J/10 | 6mm |
Matching Hook to Yarn
Most yarn labels include a recommended hook size on the packaging — a great shortcut when you’re just starting out. As a general rule, thicker yarn needs a larger hook, and thinner yarn needs a smaller one. Using the recommended pairing keeps your stitches even and your fabric neither too stiff nor too loose.
Once you understand this relationship, you’ll be able to confidently pick materials for any pattern you come across.
How to Hold the Hook and Yarn
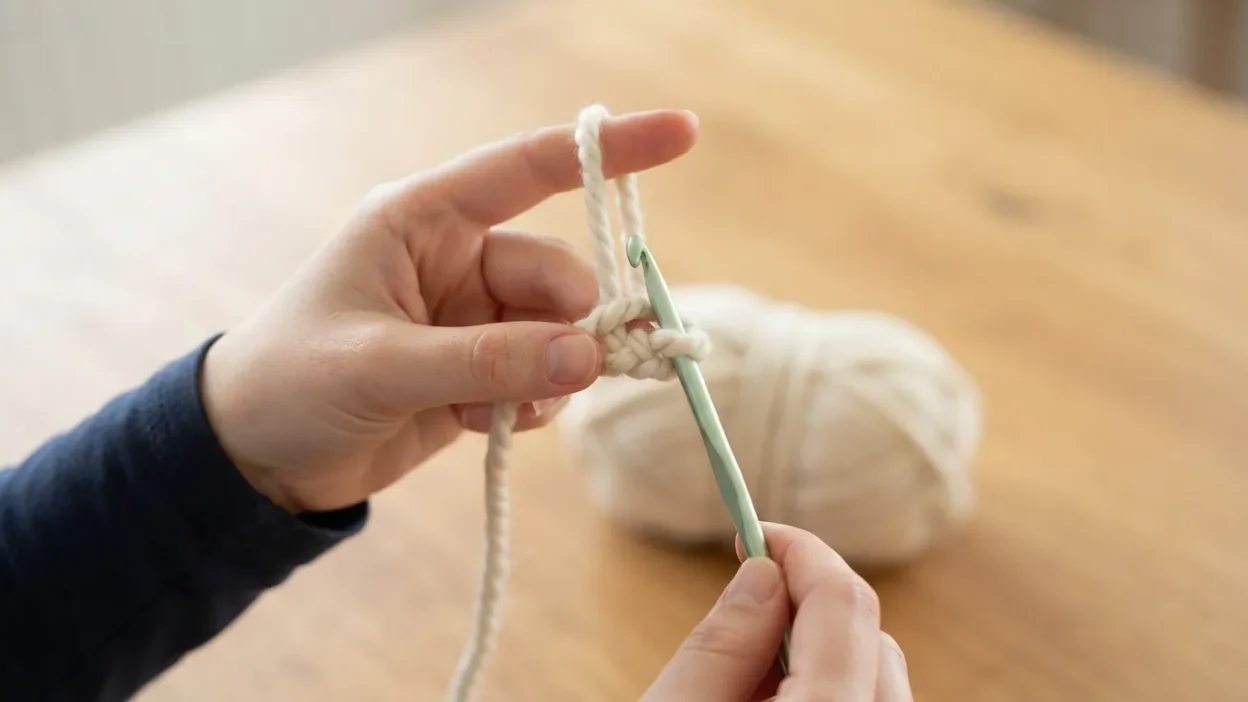
There’s no single “correct” way to hold a crochet hook or yarn — what matters most is finding a grip that feels comfortable and lets you crochet with consistent tension. Most beginners start with one of two hook grips and adjust from there.
Pencil Grip
Hold the hook the way you’d hold a pencil, with your thumb and index finger near the tip and the hook resting against your palm. This grip offers precise control and is a natural choice for anyone who already writes this way.
Knife Grip
Hold the hook the way you’d hold a knife, with your whole hand wrapped around the shaft and your thumb resting on top near the hook end. This grip can feel more stable for larger or heavier hooks.
Try both for a few minutes each — there’s no rule that says you have to pick one permanently. Many crocheters even switch grips depending on the project.
Tensioning the Yarn
Your other hand controls the yarn, feeding it to the hook and keeping consistent tension as you work. A common method:
- Drape the yarn over your index finger
- Weave it under your middle finger, over your ring finger, and under your pinky
- Use your index finger to guide the yarn toward the hook as you stitch
This creates just enough resistance to keep your stitches even — not so tight that you’re fighting the yarn, and not so loose that your stitches come out sloppy or uneven.
A Note on Tension
It’s completely normal for your first few rows to look uneven. Tension is a skill that develops with practice, and most crocheters notice a real improvement after just a few sessions. Don’t judge your early work too harshly — focus on repeating the motions until they feel natural.
With a comfortable grip and steady tension, you’re ready to learn your very first stitch: the slip knot and chain stitch.
Foundational Techniques
Every crochet project — no matter how simple or complex — starts with the same two building blocks: the slip knot and the chain stitch. Master these, and you’ve already cleared the biggest hurdle for beginners.
Making a Slip Knot
The slip knot creates your first loop on the hook and anchors your yarn before you begin stitching.
- Measure out a few inches of yarn from the end (this becomes your tail).
- Cross the yarn over itself to form a loop, with the tail hanging behind.
- Insert your hook into the loop and pull the working yarn through.
- Gently tighten the knot around the hook — it should be snug but able to slide, not tight.
Understanding the Yarn Over (YO)
The “yarn over” is a motion you’ll repeat constantly in crochet — it’s the foundation of almost every stitch. It simply means wrapping the working yarn over the hook from back to front before pulling it through a loop. Getting comfortable with this motion early will make every stitch that follows much easier to learn.
The Chain Stitch (ch)
The chain stitch is the very first real stitch most beginners learn, and it forms the foundation row for most projects.
- Yarn over.
- Pull the yarn through the loop already on your hook.
- That’s one chain stitch complete.
- Repeat steps 1–3 to build a chain of any length.
Counting Your Chains
Accurate counting matters — a pattern that calls for “chain 20” won’t work correctly if you’ve made 18 or 22. To count, look at the front of your chain: each V-shaped stitch counts as one chain (skip the loop still on your hook — that one isn’t counted yet).
Practice Tip
Before moving on to other stitches, spend time just making chains. Try a chain of 20–30 stitches several times in a row, aiming for even spacing and consistent tension throughout. This repetition builds the muscle memory you’ll rely on for every project going forward.
Once chaining feels natural, you’re ready to turn that foundation into actual fabric — starting with the single crochet stitch.
Core Stitches
With chaining under your belt, it’s time to learn the stitches that turn a simple chain into actual fabric. Work through these roughly in order — each builds on the skills of the last.
Slip Stitch (sl st)
The shortest stitch in crochet, mostly used to join rounds or move across existing stitches without adding height.
- Insert your hook into the next stitch.
- Yarn over and pull through both the stitch and the loop on your hook in one motion.
Single Crochet (sc)
The most common beginner stitch — short, dense, and forgiving of uneven tension. Great for dishcloths, coasters, and amigurumi.
- Insert your hook into the next stitch.
- Yarn over and pull through just the stitch (you’ll have 2 loops on your hook).
- Yarn over again and pull through both loops.
Half Double Crochet (hdc)
A medium-height stitch that works up faster than single crochet while still creating a fairly dense fabric — popular for scarves and blankets.
- Yarn over before inserting your hook (this extra step is what makes it “half double”).
- Insert your hook into the next stitch.
- Yarn over and pull through the stitch (3 loops on your hook).
- Yarn over once more and pull through all 3 loops at once.
Double Crochet (dc)
Taller and quicker to work up than hdc, commonly used in blankets, garments, and open, airy patterns.
- Yarn over before inserting your hook.
- Insert your hook into the next stitch.
- Yarn over and pull through the stitch (3 loops on your hook).
- Yarn over and pull through just 2 loops (2 loops remain).
- Yarn over and pull through the last 2 loops.
Treble/Triple Crochet (tr)
An even taller stitch used for lacy, open patterns. It follows the same logic as double crochet, just with an extra yarn over and one more “pull through 2” step.
Turning Chains
At the end of each row, you’ll typically make a small chain (1–3 stitches, depending on which stitch comes next) before turning your work. This “turning chain” brings your yarn up to the correct height to start the next row evenly.
A Quick Reference
As a rule of thumb, taller stitches use more yarn and work up faster, while shorter stitches create denser, sturdier fabric. Most beginner patterns will specify exactly which stitch to use — but recognizing this pattern helps you understand why a pattern calls for one stitch over another.
Once these four stitches feel familiar, you’ll be able to follow the vast majority of beginner crochet patterns.
Working in Rows vs. Rounds
Once you’re comfortable with the core stitches, the next skill to learn is how projects are actually structured — either in flat rows or in continuous rounds. Most beginner patterns use one of these two approaches.
Working in Rows
This is the method used for flat pieces like scarves, dishcloths, and blankets.
- Complete a row of stitches across your foundation chain.
- Make your turning chain (usually 1–3 chains, depending on the stitch).
- Turn your work over so you’re facing the opposite direction.
- Work back across the row you just made, stitching into the tops of the previous row’s stitches.
This back-and-forth pattern repeats for the length of the project, gradually building up rows of fabric.
Working in Rounds
Rounds are used for projects like granny squares, hats, amigurumi, and anything worked outward from a center point. There are two common approaches:
- Joined rounds — You complete a full circle of stitches, then join the last stitch to the first with a slip stitch before starting the next round. This is common in granny squares and flat circular pieces, and it creates a visible seam line.
- Continuous rounds — Instead of joining, you spiral continuously from one round into the next without a slip stitch. This is the standard method for amigurumi, since it avoids a visible seam and creates a smoother, more seamless shape.
Joining Rounds
To join a round, insert your hook into the very first stitch of the round, yarn over, and pull through both loops on your hook (a slip stitch). Many patterns will then have you chain 1–3 stitches before starting the next round, depending on the stitch height you’re about to work.
A Helpful Tip
Use a stitch marker to mark the first stitch of a continuous round — without a joining slip stitch, it’s easy to lose track of where each round begins, especially in the first few projects.
Understanding the difference between rows and rounds means you’ll know exactly what a pattern is asking of you before you even pick up your hook — a key step toward reading patterns confidently, which we’ll cover next.
Reading Crochet Patterns
Once you know the basic stitches and structures, the next skill is learning to read a pattern — the “recipe” that tells you exactly what to make and how.
Common Abbreviations
Crochet patterns rely on standardized shorthand to stay concise. Some of the most common abbreviations include:
- ch — chain
- sl st — slip stitch
- sc — single crochet
- hdc — half double crochet
- dc — double crochet
- tr — treble crochet
- st(s) — stitch(es)
- rep — repeat
- inc — increase
- dec — decrease
- sk — skip
Most patterns include a key or glossary at the top, but it’s worth memorizing the basics so you’re not constantly flipping back and forth.
Understanding Stitch Counts
At the end of many rows or rounds, patterns include a stitch count in parentheses, like (12 sts). This tells you exactly how many stitches you should have if you’ve followed the row correctly — a built-in way to catch mistakes early, before they compound into a bigger problem a few rows later.
Reading Repeats
Patterns often use asterisks (*) or brackets to indicate a sequence that repeats. For example, “*sc, ch 1; rep from * across” means you repeat the “sc, ch 1” sequence for the rest of the row. This shorthand keeps patterns compact instead of spelling out every single stitch.
Written Patterns vs. Charts
Some patterns are written entirely in text, while others use visual charts with symbols representing each stitch. Charts can be especially helpful for visual learners or for complex stitch patterns where text alone is hard to follow — though as a beginner, starting with written patterns is usually easier.
US vs. UK Terminology
One major gotcha for beginners: the US and UK use different names for the same stitches. For example, a US “single crochet” is called a “double crochet” in the UK. Always check which terminology a pattern uses before you start, especially if you’re following a source outside your home country — using the wrong stitch can throw off your entire project.
Learning to read a pattern well means you can follow almost any beginner-friendly design with confidence, which brings us to picking your very first real project.
Your First Projects
With the basics in place, it’s time to put your new skills to use. Start with small, simple projects that reinforce what you’ve learned before moving on to anything with shaping or color changes.
1. Practice Swatch
Before committing to a full project, make a simple square using only chains and single crochet. This isn’t meant to be a finished item — it’s a low-pressure way to practice tension, stitch consistency, and turning rows without worrying about “ruining” anything.
2. Dishcloth or Coaster
A basic single crochet dishcloth is one of the most popular first projects, and for good reason: it only requires chaining a foundation row and repeating single crochet across each row until you reach a square. It’s useful, quick to finish, and forgiving of small mistakes.
3. Granny Square
The granny square introduces you to working in joined rounds, basic shaping, and (optionally) color changes. It’s a foundational skill in crochet — once you can make one, you can make dozens and join them into blankets, bags, or garments.
4. Simple Scarf
A scarf worked in single or double crochet is a great next step, since it lets you practice maintaining even tension and consistent stitch counts over a longer piece, without the added complexity of shaping.
5. Basic Beanie
Once you’re comfortable working in continuous rounds, a simple beanie introduces gentle increases and decreases — your first real taste of shaping a project to fit a specific form.
A Note on Project Order
Resist the urge to jump straight to an ambitious project like a sweater or a stuffed animal. Small, simple projects let you build muscle memory and confidence quickly, and finishing something — even something tiny — is one of the best motivators for sticking with a new craft.
As you work through your first few projects, you’ll inevitably run into a few snags. That’s completely normal, and next we’ll cover the most common beginner mistakes and how to fix them.
Common Beginner Mistakes and Fixes
Almost every crocheter runs into the same handful of issues when starting out. Recognizing them early makes it much easier to fix — and avoid — them going forward.
Crocheting Too Tightly
This is the most common beginner issue. If you’re gripping the hook hard and your stitches feel stiff or difficult to insert the hook into, you’re likely tensioning too tight. Try consciously relaxing your grip and letting more yarn feed through as you stitch. This usually improves naturally within the first few projects as your hands get used to the motion.
Crocheting Too Loosely
Less common, but it happens — stitches that are too loose create a floppy, uneven fabric with visible gaps. If this is your issue, try wrapping the yarn through one more finger when tensioning to add slightly more resistance.
Losing Track of Stitch Count
It’s easy to lose count partway through a row, especially in longer projects. Get in the habit of counting your stitches at the end of every row and comparing them to the pattern’s stated count. Catching a mistake immediately is far easier than catching it five rows later.
Accidentally Increasing or Decreasing
A project that’s slowly getting wider or narrower usually means stitches are being added or skipped without realizing it. The most common culprits are:
- Missing the first stitch of a row
- Accidentally working two stitches into one
- Mistaking a turning chain for an actual stitch
Skipping the First or Last Stitch
This is one of the sneakiest beginner mistakes, since it doesn’t always look wrong right away. It slowly shrinks (or grows) your project row by row. Get in the habit of deliberately counting the first and last stitch of every row until it becomes automatic.
Uneven Edges
Wavy or jagged edges are usually a sign of inconsistent turning chains or skipped stitches at the row’s start or end. Double-checking your stitch count at the edges — not just in the middle of the row — helps catch this early.
Curling Fabric
It’s common for early crochet swatches to curl, especially with single crochet. This is often just a tension issue and tends to resolve itself as your stitches become more even with practice — though blocking (dampening and pinning the fabric flat to dry) can also help correct it.
The good news: every one of these mistakes is fixable, and even experienced crocheters run into them from time to time. Next, we’ll cover exactly how to fix the ones that do slip through
Fixing Mistakes
No matter how careful you are, mistakes are simply part of learning to crochet — even experienced crocheters undo work regularly. Knowing how to fix errors confidently means a mistake never has to mean starting completely over.
How to “Frog” Your Work
“Frogging” is crochet slang for unraveling your stitches (because you “rip it, rip it” — like a frog’s ribbit). To frog:
- Remove your hook from the loop.
- Gently pull the working yarn to unravel stitches one at a time, working backward.
- Stop once you’ve unraveled past the mistake.
- Reinsert your hook into the last correct loop and resume stitching from there.
Frogging can feel discouraging at first, but it’s a completely normal — even expected — part of the process. Most crocheters frog far more often than they’d like to admit, especially early on.
Fixing a Dropped Stitch
If you notice a loop has slipped off your hook, don’t panic. Simply reinsert your hook into the dropped loop and continue working from that point. If it’s a few rows back and you didn’t catch it immediately, you may need to frog back to that row instead.
Fixing a Missed or Extra Stitch
If your stitch count is off at the end of a row, look for the spot where the count changed:
- Too few stitches — you likely skipped a stitch or worked into the wrong loop. Frog back to before the mistake and re-work the row carefully, checking each stitch as you go.
- Too many stitches — you likely worked two stitches into one by accident. Frog back and re-count as you redo the row.
Weaving in Ends Properly
Once a project is finished, loose yarn tails need to be secured so they don’t unravel over time.
- Thread the tail onto a yarn needle.
- Weave the needle through several nearby stitches, following the path of the yarn (this hides it well).
- Change direction once and weave back through a few more stitches for extra security.
- Trim the excess yarn close to the fabric.
A Mindset Shift
Try to think of frogging not as failure, but as part of the craft’s natural rhythm — a chance to correct course and end up with a cleaner finished piece. The more you practice fixing mistakes, the less intimidating they become, and the faster you’ll be able to catch and correct them in the future.
With mistakes no longer feeling like a roadblock, the final piece of the puzzle is building crochet into a lasting habit.
Building the Habit
Learning the mechanics of crochet is only half the equation — turning it into a skill you actually retain comes down to consistent practice and staying motivated as you go.
Practice Frequency
Short, regular practice sessions tend to build muscle memory faster than infrequent, marathon sessions. Even 15–20 minutes a day is often more effective than a single three-hour session once a week, since your hands and brain need repeated exposure to the motions to make them feel automatic.
Video Tutorials vs. Written Patterns
Many beginners find it helpful to pair written instructions with video tutorials, at least at first. Seeing the hook angle, yarn tension, and hand movement in motion can clarify details that are hard to picture from text alone. Once the core stitches feel familiar, written patterns become much easier to follow on their own.
Setting Realistic Expectations
It’s normal for early projects to look imperfect — uneven tension, slightly wavy edges, or inconsistent stitch sizes are all part of the learning curve, not a sign you’re “bad” at crochet. Most crocheters see noticeable improvement within their first few completed projects.
Joining a Crochet Community
Connecting with other crocheters can make a big difference in staying motivated and troubleshooting problems quickly:
- Online communities — Forums, Reddit’s crochet communities, and Facebook groups are full of beginners and experienced crocheters alike, happy to answer questions.
- Ravelry — A popular platform for finding patterns, tracking projects, and connecting with other crafters.
- Social media — Instagram, TikTok, and YouTube are great sources for quick tips, trending patterns, and visual troubleshooting.
- Local classes or clubs — Many yarn shops offer beginner classes or “stitch and bitch” meetups, which can be especially helpful for hands-on feedback.
Tracking Your Progress
Consider keeping your early practice swatches or first finished projects, even if they’re imperfect. Looking back on them after a few months is a great reminder of how quickly skills develop with regular practice.
Building crochet into a habit sets the foundation for real growth — and once the basics are second nature, you’ll be ready to expand into new techniques and more ambitious projects.
Next Steps After Mastering Basics
Once the fundamentals feel comfortable, a whole new world of crochet techniques opens up. Here’s where to focus your growth next.
Increases and Decreases (Shaping)
Shaping is what allows you to move beyond flat squares and rectangles into garments, amigurumi, and anything with curves or contours.
- Increase (inc) — Working two or more stitches into a single stitch to add width.
- Decrease (dec) — Combining two stitches into one to reduce width.
These two techniques are the building blocks of hats, sleeves, stuffed animal limbs, and any shaped piece — mastering them is often considered the real turning point from “beginner” to “intermediate” crocheter.
Color Changes and Stripes
Working with multiple colors opens up a huge range of creative possibilities, from simple stripes to more advanced colorwork like tapestry crochet. The core skill is learning to switch yarns cleanly at the end of a stitch so the color change looks crisp rather than messy — a small technique that makes a big visual difference.
Basic Garment Construction
Garments introduce new considerations beyond basic stitches: gauge (matching your tension to a pattern’s specifications), sizing, and assembling multiple pieces (like sleeves and a body) into a finished item. Starting with simple, oversized designs — like a basic granny square vest or a simple poncho — is an easier entry point than a fitted sweater.
Exploring Different Yarn Fibers
As you grow more confident, experimenting with different fibers can change how your projects look and feel:
- Cotton — Great for dishcloths and summer wear; sturdy and breathable.
- Wool — Warm and elastic, ideal for winter accessories.
- Acrylic — Affordable, durable, and easy to care for; a beginner staple.
- Blends — Combine properties of multiple fibers, often balancing cost and quality.
New Stitch Patterns
Beyond the basic stitches, techniques like shells, clusters, popcorns, and cables add texture and visual interest to your work. Learning a few new stitch patterns is often the easiest way to keep projects feeling fresh without a steep learning curve.
Trying Amigurumi
If you enjoyed working in continuous rounds, amigurumi (crocheted stuffed toys) is a natural next step — it combines shaping, continuous rounds, and finishing techniques like sewing pieces together and adding safety eyes.
With these skills in your toolkit, you’ll be well-equipped to tackle nearly any pattern you come across — which brings us to a few common questions beginners often still have.
Frequently Asked Questions
How long does it take to learn crochet?
Most beginners can learn the basic stitches — chain, single crochet, and double crochet — within a few practice sessions, often in just a week or two of casual practice. Feeling truly comfortable and consistent with tension usually takes a few completed projects, commonly around 4–6 weeks of regular practice.
Is crochet easier than knitting?
Many beginners find crochet easier to start with, since it uses a single hook rather than two needles, and dropped stitches are much less likely (and easier to fix) than in knitting. That said, “easier” is subjective — both crafts have their own learning curves, and some people naturally take to one faster than the other.
Can I teach myself crochet?
Yes — crochet is one of the most self-teachable crafts, thanks to the wide availability of free video tutorials, written guides, and beginner communities online. Many experienced crocheters are entirely self-taught, especially with the visual step-by-step resources available today.
What’s the best yarn for beginners?
A light-colored, worsted weight (category 4) yarn in a smooth, non-fuzzy texture is widely considered the best choice for beginners. Light colors make stitches easy to see, and smooth acrylic or cotton yarns are forgiving to work with and easy on the budget.
Do I need to buy expensive supplies to start?
No — a basic hook and a single skein of affordable acrylic yarn is all you need to begin. Crochet has a very low cost of entry compared to many other crafts, and you can always upgrade tools and materials as your skills and preferences develop.
What if I’m left-handed?
Crochet works exactly the same for left-handed crocheters, just mirrored — instructions are worked from left to right instead of right to left. Many tutorials now include left-handed versions, or you can mirror a right-handed video by watching it and reversing the direction.
Conclusion
Learning how to start crochet really comes down to a handful of simple motions — the slip knot, the chain stitch, and a few core stitches — repeated until they feel natural. From there, everything else builds gradually: reading patterns, understanding shaping, fixing mistakes, and eventually creating projects you’re genuinely proud of.
Don’t worry if your first few rows look uneven or your first project doesn’t turn out exactly like the picture — every crocheter, no matter how skilled, started exactly where you are now. The key is consistency: a little practice a few times a week will get you further than waiting for a big block of free time.
So grab a hook, pick up some yarn, and make your first chain. The best way to learn crochet is simply to start.