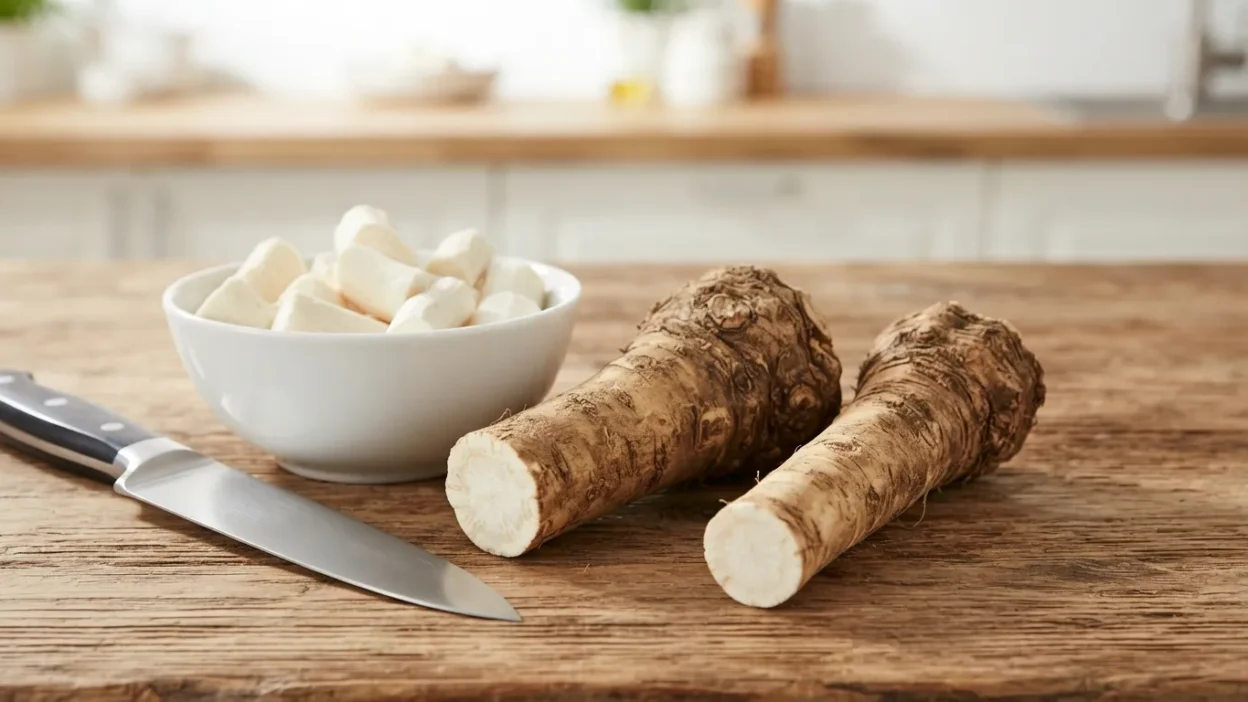
If you’ve only ever tried horseradish from a jar, you’re in for a surprise. Learning how to make horseradish at home gives you a condiment that’s sharper, fresher, and far more powerful than anything on the grocery store shelf. That sinus-clearing kick that makes your eyes water? It’s at its absolute peak the moment the root is freshly grated.
The best part is how simple it is. You need just three ingredients (fresh horseradish root, vinegar, and salt) and about 10 minutes. No canning, no special equipment, and no cooking required.
In this guide, I’ll walk you through choosing the right root, grinding it safely, and controlling the heat so your horseradish comes out exactly as mild or fiery as you like. You’ll also find tips for variations, storage, and fixing common problems.
How to Make Horseradish at Home (Fresh, Fiery, and Ready in 10 Minutes)
If you’ve only ever tried horseradish from a jar, you’re in for a surprise. Learning how to make horseradish at home gives you a condiment that’s sharper, fresher, and far more powerful than anything on the grocery store shelf. That sinus-clearing kick that makes your eyes water? It’s at its absolute peak the moment the root is freshly grated.
The best part is how simple it is. You need just three ingredients (fresh horseradish root, vinegar, and salt) and about 10 minutes. No canning, no special equipment, and no cooking required.
In this guide, I’ll walk you through choosing the right root, grinding it safely, and controlling the heat so your horseradish comes out exactly as mild or fiery as you like. You’ll also find tips for variations, storage, and fixing common problems.
Choosing and Buying Horseradish Root
The quality of your root decides the quality of your horseradish, so it’s worth spending a minute at the store to pick a good one.
What to Look For
- Firm and heavy: A fresh root feels solid and dense, like a good carrot. If it bends easily or feels light, it’s drying out.
- Smooth, tan skin: Minor scratches and rough patches are normal, but the skin should look clean and intact.
- No soft spots or mold: Squeeze along the length of the root. Mushy areas, dark blotches, or fuzzy mold mean it’s past its prime.
- No green sprouting: Green tips or shoots signal an older root with a weaker flavor.
- Creamy white inside: If you can see a cut end, the flesh should be bright white. Gray or brown streaks suggest age.
Where to Find It
Fresh horseradish root is sold at many grocery stores in the produce section, usually near the ginger and other root vegetables. Farmers’ markets, specialty grocers, and international markets are also good sources. Availability is best from fall through spring, and it often appears in stores around spring holidays. If you can’t find it, ask the produce manager, who can sometimes order it.
How Much Root Do You Need?
A good rule of thumb is that about half a pound of root yields roughly one small jar of prepared horseradish. A root around 8 to 10 inches long is plenty for a first batch. Remember that homemade horseradish is potent, and a little goes a long way.
Storing the Root Before Use
If you’re not making it right away:
- Refrigerator: Wrap the unpeeled root in a paper towel, place it in a bag, and keep it in the crisper drawer. It should stay fresh for a couple of weeks.
- Freezer: Wrap it tightly and freeze the whole root. You can grate it straight from frozen, which also makes the job easier on your eyes.
Growing Your Own
Horseradish is easy to grow, and many gardeners grow it for a steady supply. It spreads aggressively, so plant it where it can’t take over. (This could link to a future post on growing horseradish.)
Ingredients
Part of the appeal of this recipe is how short the ingredient list is. Here’s everything you need.
The Essentials
- Fresh horseradish root: About ½ pound (roughly 8 ounces), peeled and cut into small chunks. This makes about one small jar.
- White vinegar: Around 6 to 7 tablespoons, adjusted to reach your preferred texture.
- Salt: About ½ teaspoon. Fine sea salt or kosher salt both work.
Optional Add-Ins
- Cold water: 1 to 2 tablespoons, only if your food processor or blender needs a little extra liquid to keep the blades moving.
- Sugar: A pinch (up to ½ teaspoon) to round off the sharp edges.
- Lemon juice: A teaspoon or two for brightness.
- Cooked beet: A small piece blended in gives a milder, sweeter, ruby-red version (more on this in the variations section).
Choosing Your Vinegar
White vinegar is the classic choice because it keeps the horseradish bright white and lets its natural flavor shine. Other vinegars work too, but each changes the result:
| Vinegar | Effect on flavor and color |
|---|---|
| White distilled | Clean, sharp, keeps the color white |
| White wine | Softer, slightly fruity |
| Apple cider | Mellow and tangy, tends to darken the color slightly |
| Raw apple cider (with the “mother”) | Used for fermented versions, with a deeper, tangier flavor |
Basic Ratio Guide
Use this table to scale your batch. These are starting points, since the right amount of vinegar depends on your root and how smooth you want the texture.
| Batch size | Peeled root | Vinegar | Salt |
|---|---|---|---|
| Small | ¼ lb (about ¾ cup cubed) | 3 to 4 tbsp | ¼ tsp |
| Standard | ½ lb (about 1½ cups cubed) | 6 to 7 tbsp | ½ tsp |
| Large | 1 lb (about 3 cups cubed) | ¾ cup | 1 tsp |
Tip: Add the vinegar gradually. The mixture should be moist and spoonable, but not swimming in liquid. You can always add more, but you can’t take it back out. (If it ends up too wet, simply drain off the excess before using.)
Equipment
You don’t need anything fancy to make horseradish. Most kitchens already have what’s required.
The Basics
- Vegetable peeler: For removing the tough outer skin. A paring knife works too, especially on gnarly, uneven roots.
- Cutting board and knife: For chopping the peeled root into small chunks if you’re using a machine.
- Grating or grinding tool: Choose one of the following:
- Food processor: The fastest and most popular option. It produces a fine, even texture in seconds.
- High-powered blender: Works well with a little added liquid, and gives a very smooth result.
- Box grater or microplane: The no-machine option. It takes more effort, but gives you great control over texture.
- Glass jar with a tight-fitting lid: For storing your finished horseradish. A small canning jar is ideal. Glass is best because horseradish is pungent and can absorb odors from plastic.
- Rubber spatula: For scraping every bit out of the bowl and into the jar.
Optional but Helpful
- Safety goggles or glasses: Freshly ground horseradish releases fumes strong enough to sting your eyes. Eye protection makes the job much more comfortable.
- Disposable gloves: Handy if you have sensitive skin, since the juice can irritate it.
- Fan or open window: Good ventilation makes a big difference. A fan pointed away from you keeps the fumes moving.
- Fine-mesh strainer or coffee filter: For draining off excess liquid if your mixture turns out too wet.
Which Tool Should You Choose?
| Tool | Best for | Things to know |
|---|---|---|
| Food processor | Speed and consistency | Strongest fumes when you open the lid, so let it settle first |
| Blender | Ultra-smooth texture | Needs a little liquid to keep the blades moving |
| Box grater | No special equipment | Slow, with the most fume exposure on your face |
| Microplane | Fine, fluffy texture | Great for small batches |
Tip: Whatever you use, avoid metal tools or containers that can react with vinegar over time. Stainless steel is fine, but glass or ceramic is safest for storage.
Safety and Prep Tips
Freshly ground horseradish is much stronger than chopped onions, so a little preparation keeps the process comfortable. Treat this section as your “tear alert.”
Ventilate Before You Start
- Open a window or turn on the range hood before you begin.
- Place a fan nearby, pointed away from your face, to push the fumes out of the room.
- If the weather is nice, do the grinding outdoors.
Protect Your Eyes and Skin
- Wear safety goggles or glasses if you have them. They make a real difference.
- Use disposable gloves if you have sensitive skin, since the juice can cause irritation.
- Wash your hands thoroughly when you finish, and keep them away from your eyes, nose, and mouth until you do.
Handle the Fumes Carefully
The strongest burst of fumes comes at the moment you open the food processor or blender lid.
- Let it settle: Wait 30 to 60 seconds after grinding before lifting the lid.
- Keep your distance: Open the lid at arm’s length and turn your face away.
- Don’t take a deep sniff: Even a curious whiff can be overwhelming.
Smart Prep Habits
- Peel and chop first: Do all your prep work before grinding so you can move quickly once the root is processed.
- Have your vinegar measured out: Since timing affects the heat level, you’ll want it ready to go.
- Clean up promptly: Rinse the processor bowl and blades right away. Dried horseradish residue is tough to remove, and the smell lingers.
Keep Kids and Pets Away
The fumes can irritate children and pets, so keep them out of the kitchen while you work.
A Quick Note on Comfort
If your eyes sting, step away into fresh air, and splash cool water on your face. The effect fades quickly. It may look dramatic, but it isn’t harmful, as long as you ventilate and avoid direct exposure.
Step-by-Step Instructions
Here’s the full process, from root to jar. Set aside about 10 to 15 minutes, and have your ventilation and eye protection ready before you start.
You’ll need: ½ pound fresh horseradish root, 6 to 7 tablespoons white vinegar, ½ teaspoon salt, and 1 to 2 tablespoons cold water (only if needed).
Step 1: Wash the Root
Scrub the horseradish under cool running water to remove dirt, especially in the crevices. Pat it dry.
Step 2: Peel It
Use a vegetable peeler to remove the brown skin, just as you would with a carrot. For knobby or uneven spots, a paring knife works better. Trim off the tough ends and any brown or dark patches.
What it should look like: Bright, creamy white flesh all the way through.
Step 3: Cut Into Small Chunks
Chop the peeled root into ½-inch pieces. Smaller, even pieces help your food processor or blender grind them evenly and protect the machine from straining.
Step 4: Grind or Grate
Add the chunks to a food processor and pulse until finely minced, about 20 to 30 seconds. If your machine struggles, add a tablespoon of cold water to help the blades move. Using a box grater or microplane? Grate the root directly into a bowl, working in a well-ventilated area.
Safety reminder: Let the processor settle for 30 to 60 seconds before opening the lid, and keep your face turned away.
What it should look like: A fine, fluffy, damp mince, similar to coarse snow.
Step 5: Add the Vinegar and Salt
This is the moment that decides your heat level. Add the vinegar and salt to the ground horseradish and pulse until combined.
- For milder horseradish: Add the vinegar right away.
- For hotter horseradish: Wait 2 to 3 minutes first.
Start with about 4 tablespoons of vinegar, then add more a spoonful at a time until the mixture is moist and spoonable, but not soupy. (The next section covers heat control in more detail.)
Step 6: Adjust the Texture
Pulse again to reach your desired consistency:
- Chunky: Pulse briefly for a rustic texture, great on sandwiches.
- Smooth: Blend longer for a creamy, spreadable result.
Taste a tiny amount on a spoon, since it’s potent. If it’s too dry, add a little more vinegar. If it’s too wet, drain off the excess.
Step 7: Jar and Chill
Use a rubber spatula to transfer the horseradish to a clean glass jar. Press it down gently to remove air pockets, then seal tightly with the lid. Refrigerate right away.
Rest time: The flavor settles and mellows slightly after a few hours in the fridge, so it’s even better the next day.
Quick Recipe Summary
- Prep time: 10 to 15 minutes
- Yield: About 1 cup (one small jar)
- Storage: Refrigerate in a sealed glass jar
How to Control the Heat
The best part of making horseradish yourself is that you decide how strong it is. The secret is simple: the timing of when you add the vinegar.
Why Timing Matters
Once the root is ground, the pungent compound that gives horseradish its bite begins to build. Vinegar’s acidity stops that reaction and locks in whatever heat has developed so far. Add it right away and you trap a gentler flavor. Wait a few minutes and the heat keeps building before you lock it in.
Heat-Level Chart
| Heat level | When to add vinegar | Flavor |
|---|---|---|
| Mild | Immediately after grinding | Gentle warmth with a fresh, earthy flavor |
| Medium | After 1 to 2 minutes | Noticeable kick that’s still enjoyable |
| Hot | After 3 to 5 minutes | Sharp, sinus-clearing heat |
Waiting much longer than 5 minutes doesn’t add much more heat, and the flavor can start to turn bitter. For most people, 2 to 3 minutes is the sweet spot.
Other Ways to Adjust the Heat
- Use a younger, fresher root: Fresh roots are the most potent. Older roots lose strength.
- Grind it finer: More broken cells means more heat, so a fine, smooth grind is hotter than a chunky one.
- Add less vinegar: A drier mixture tastes stronger, while extra liquid dilutes it.
- Mix in a mellowing ingredient: A little sugar, cooked beet, or sour cream softens the bite.
How to Fix Horseradish That’s Too Hot
- Stir in a little extra vinegar and a pinch of sugar.
- Blend in a small piece of cooked beet.
- Fold it into sour cream, mayonnaise, or crème fraîche to make a creamy sauce.
Remember: It Fades
Homemade horseradish is at its fiercest in the first day or two, then slowly mellows in the fridge. If your batch seems almost too strong at first, give it a day.
Making Horseradish Without a Food Processor
No food processor? No problem. People made horseradish by hand long before electric appliances, and you can too. Here are three reliable methods.
Method 1: Box Grater
Best for: Anyone with basic kitchen tools.
- Peel the root and cut it into manageable lengths, about 3 to 4 inches.
- Grate it on the small, fine holes of a box grater, working over a bowl.
- Grate in a well-ventilated area, and keep your face as far from the bowl as you comfortably can.
- Add the vinegar and salt, and stir until the texture is moist and spoonable.
Pros: No machine needed, and you control the texture.
Cons: It’s slower, and the fumes rise straight toward your face. Eye protection helps a lot here.
Method 2: Microplane or Fine Grater
Best for: Small batches and a fine, fluffy texture.
- Hold the peeled root firmly and run it across the microplane in long strokes.
- Collect the grated horseradish in a bowl.
- Stir in the vinegar and salt.
Pros: It produces a very fine, even texture without much effort.
Cons: It’s impractical for large batches, and the root gets harder to grip as it shrinks. Stop when you have a small nub left, to protect your knuckles.
Method 3: Blender With Cold Water
Best for: Ultra-smooth horseradish.
- Cut the peeled root into small chunks.
- Add them to a blender with a few tablespoons of cold water, just enough to keep the blades moving.
- Blend until smooth, then let it settle before opening the lid.
- Add the vinegar and salt, and pulse to combine.
Pros: Very creamy results.
Cons: The added water can dilute the flavor, so drain off any excess liquid before jarring.
Quick Comparison
| Method | Effort | Texture | Fume level |
|---|---|---|---|
| Box grater | High | Coarse to medium | High |
| Microplane | Medium | Fine and fluffy | Medium |
| Blender | Low | Smooth | Release when opening lid |
Tip: Freezing the root for an hour or two before grating makes it firmer and easier to handle, and the fumes are noticeably gentler.
Recipe Variations
Once you’ve mastered the classic version, it’s easy to branch out. Each of these starts with the basic prepared horseradish from the steps above.
Classic Prepared Horseradish (White)
The traditional version: horseradish, white vinegar, and salt. It’s bright white, sharp, and clean-tasting, which makes it the most versatile choice for roast beef, sandwiches, and cocktail sauce.
Beet Horseradish (Red)
A beloved Eastern European favorite, often served with fish and holiday meals.
- Add ¼ cup cooked or raw grated beet for every 1 cup of horseradish.
- Blend until the color is an even ruby red.
- The beet adds natural sweetness and softens the heat, so it’s a good choice if you find classic horseradish too intense.
Creamy Horseradish Sauce
The go-to partner for prime rib and steak.
- Mix 2 to 3 tablespoons of drained prepared horseradish into ½ cup of sour cream, or a blend of sour cream and mayonnaise.
- Add a pinch of salt, a squeeze of lemon juice, and black pepper to taste.
- Chill for at least 30 minutes so the flavors can meld.
Tip: Drain the horseradish well first so the sauce doesn’t turn runny.
Horseradish Mustard
- Stir 1 to 2 tablespoons of prepared horseradish into ¼ cup of Dijon or whole-grain mustard.
- It’s excellent on ham sandwiches, pretzels, and sausages.
Cocktail Sauce Base
- Combine ketchup, prepared horseradish, lemon juice, and a dash of Worcestershire sauce.
- Adjust the horseradish to your preferred heat level. This is the classic dip for shrimp.
Flavored Versions
Experiment with small additions:
- Garlic: One small grated clove for a savory edge.
- Lemon: Zest or juice for freshness.
- Fresh herbs: Dill or chives work especially well in creamy versions.
- Honey: A teaspoon for a sweet-hot balance.
Fermented Horseradish
For a tangier, probiotic-style version, use raw apple cider vinegar with the “mother” instead of white vinegar. Pack the salted horseradish into a jar, cover it with the vinegar, and let it sit at room temperature for a few days before refrigerating. Expect a deeper flavor and a slightly darker color.
Troubleshooting
Even a simple recipe can go sideways. Here are the most common problems and how to fix them.
Problem: It’s Not Spicy Enough
Likely causes:
- The root was old, dried out, or sat in the store for too long.
- The vinegar went in too soon, locking in only a little heat.
- The pieces were ground too coarsely.
- You added too much liquid, which diluted the flavor.
Fixes:
- Next time, wait 2 to 3 minutes before adding the vinegar.
- Grind the root more finely.
- Drain off excess liquid, or blend in a bit more freshly grated root.
- Start with a firm, fresh root.
Problem: It’s Too Hot
Fixes:
- Stir in a little extra vinegar and a pinch of sugar.
- Blend in a small piece of cooked beet.
- Mix it into sour cream or mayonnaise for a creamy sauce.
- Give it a day or two in the fridge, since the heat naturally mellows.
Problem: It Tastes Bitter
Likely causes:
- The horseradish sat too long before the vinegar was added.
- The root was old or had dark, woody patches.
- The skin wasn’t fully peeled.
Fixes:
- Peel thoroughly and trim away any brown spots before grinding.
- Add the vinegar within about 5 minutes of grinding.
- A pinch of sugar can soften mild bitterness.
Problem: It Turned Brown or Gray
Some darkening is natural. Horseradish oxidizes when exposed to air, and homemade versions don’t contain the preservatives found in store-bought jars.
Fixes:
- Add the vinegar promptly.
- Press the horseradish down so it’s fully covered by liquid in the jar.
- Add a small squeeze of lemon juice.
- Make smaller batches and use them within a few weeks.
Problem: It’s Too Watery
Fixes:
- Strain it through a fine-mesh strainer or a coffee filter.
- Next time, add the vinegar gradually, only until the mixture is moist.
Problem: It’s Too Dry or Crumbly
Fix: Stir in more vinegar, a teaspoon at a time, until it reaches a spoonable texture.
Problem: The Flavor Weakens After a Few Weeks
This is normal. The pungent compounds fade over time. For the strongest flavor, make small batches and use them within a month or so.
How to Store Homemade Horseradish
Homemade horseradish has no preservatives, so storage matters for both safety and flavor. The good news is that the vinegar helps preserve it, and it keeps well when handled properly.
Refrigerator Storage
- Container: Use a clean glass jar with a tight-fitting lid. Glass won’t absorb the strong smell or flavor, and it keeps air out.
- Pack it down: Press the horseradish firmly into the jar so it’s covered by its liquid. Less air contact means less browning and flavor loss.
- Keep it cold: Refrigerate immediately and always return the jar to the fridge after use.
- Use clean utensils: Dipping a used spoon into the jar introduces bacteria. Always use a clean, dry spoon.
How Long Does It Last?
| Storage | Best quality | Still safe (generally) |
|---|---|---|
| Refrigerator | 4 to 6 weeks | Up to a few months, with a weaker flavor |
| Freezer | 3 to 6 months | Longer, but quality declines |
For the strongest kick, use your horseradish within the first month. After that it’s still usable, just milder. Fermented versions made with raw apple cider vinegar are often reported to keep for several months in the fridge.
Can You Freeze It?
Yes. Freezing works well if you’ve made a large batch.
- Spoon the prepared horseradish into small portions, such as an ice cube tray or small freezer containers.
- Freeze until solid, then transfer the cubes to a freezer bag.
- Thaw in the refrigerator as needed.
What to expect: The texture may become slightly softer or wetter after thawing, so drain off any extra liquid. The flavor holds up reasonably well, though it won’t be quite as sharp.
Bonus tip: You can also freeze the whole unprocessed root and grate it straight from frozen.
Signs It Has Gone Bad
Discard your horseradish if you notice:
- Visible mold, fuzzy spots, or unusual colors
- A slimy texture
- A rotten, sour, or off smell that’s different from the normal sharp aroma
- A very dark, gray-brown color combined with a strange smell
If you’re ever unsure, throw it out.
Why Does the Flavor Fade?
The compounds responsible for horseradish’s heat are unstable and break down over time. That’s why store-bought jars that have been sitting on shelves taste so tame compared with a fresh batch. To keep your supply strong, make smaller batches more often.
Ways to Use Homemade Horseradish
Now that you have a jar of fresh, fiery horseradish, here’s how to put it to work. Start with a small amount and add more to taste, since homemade is stronger than store-bought.
Classic Pairings
- Prime rib and roast beef: The traditional match. Serve it plain on the side or mixed into creamy horseradish sauce.
- Steak: A small dollop on a hot steak cuts through the richness.
- Brisket and pot roast: Stir a spoonful into the pan juices or serve it alongside.
Sandwiches and Burgers
- Spread it on roast beef sandwiches, either on its own or blended with mayonnaise.
- Add a smear to burgers, brats, or hot dogs for a spicy kick.
- Try it on a ham and cheese sandwich with a little mustard.
Seafood
- Cocktail sauce: Mix with ketchup and lemon juice for shrimp.
- Smoked salmon or smoked trout: Pair with cream cheese and horseradish on crackers or bagels.
- Oysters: A tiny spoonful on top adds a sharp, clean bite.
Drinks
- Bloody Mary: Stir in a teaspoon or more for a spicy, sinus-clearing cocktail.
Everyday Recipes
- Deviled eggs: Mix a little into the yolk filling.
- Potato salad or coleslaw: Add a teaspoon to the dressing.
- Mashed potatoes: Fold in a spoonful for a zesty twist.
- Dips and dressings: Blend into sour cream, Greek yogurt, or ranch for a spicy dip.
- Roasted vegetables: Toss with roasted beets, carrots, or potatoes right after cooking.
Holiday Favorites
- Serve it with Easter ham, holiday roasts, or as part of a Passover Seder plate.
- Beet horseradish is a traditional accompaniment to gefilte fish.
Tip: Drain horseradish before mixing it into creamy sauces, so they don’t turn watery. Stir it in at the end of cooking rather than boiling it, since heat quickly destroys its sharpness.
Nutrition and Health Notes
Horseradish is used in small amounts, so it won’t change your daily nutrition much. Here’s what’s generally worth knowing.
A Low-Calorie Condiment
Prepared horseradish is very light. A typical tablespoon contains only a handful of calories, with almost no fat. The exact numbers vary with the recipe, since added sugar or cream changes the totals.
What the Root Contains
Fresh horseradish root provides small amounts of:
- Vitamin C
- Fiber
- Potassium
- Folate
Because a serving is usually just a teaspoon or a spoonful, these amounts are modest.
Natural Plant Compounds
Horseradish belongs to the cruciferous family, along with broccoli, cabbage, and mustard. Like its relatives, it contains compounds called glucosinolates, which are responsible for its sharp flavor. These compounds are the subject of ongoing research, but the evidence is not strong enough to claim specific health benefits, so it’s best to enjoy horseradish for its flavor rather than as a remedy.
Who Should Be Cautious
- Sensitive stomachs: Large amounts can irritate the mouth, throat, and digestive tract. People with acid reflux, ulcers, or similar conditions may want to go easy.
- Sodium watchers: Salt is part of the recipe, though a spoonful contributes very little. Homemade versions let you control the amount.
- Anyone with a medical condition or on medication: Check with a doctor or registered dietitian if you’re unsure how a food fits your needs.
A Simple Takeaway
Treat horseradish as a flavorful, low-calorie way to add punch to meals without relying on heavy sauces. Use a little, enjoy the heat, and keep the focus on taste.
Frequently Asked Questions
How long does homemade horseradish last?
Homemade horseradish keeps for about 4 to 6 weeks in the refrigerator at its best flavor, and it can stay safe to eat for a few months with a milder taste. Store it in a sealed glass jar, keep it covered with its liquid, and always use a clean spoon.
Can you make horseradish without vinegar?
Yes, but it won’t keep as long or hold its heat. You can use lemon juice or a little salted water instead. Without the acid to stabilize it, the flavor fades quickly, so refrigerate it and use it within a few days.
Why is my homemade horseradish not hot?
The most common causes are an old root, adding the vinegar too soon, or grinding too coarsely. For more heat, start with a firm, fresh root, grind it finely, and wait 2 to 3 minutes before adding the vinegar.
Can you freeze horseradish?
Yes. Freeze prepared horseradish in small portions, such as an ice cube tray, then move the cubes to a freezer bag. It keeps for about 3 to 6 months. The texture may soften after thawing, so drain off extra liquid. You can also freeze the whole root.
What’s the difference between horseradish and wasabi?
They’re different plants in the same family. Horseradish has a sharp, earthy heat that hits the nose quickly. True wasabi is milder and slightly sweeter. Many “wasabi” pastes outside Japan are actually horseradish mixed with mustard and green coloring.
Can you use jarred horseradish to make sauce?
Absolutely. Drain the liquid, then stir 2 to 3 tablespoons into sour cream, mayonnaise, or crème fraîche, with a pinch of salt and a squeeze of lemon. Chill for 30 minutes so the flavors blend. Homemade horseradish will taste stronger than store-bought, so adjust to your taste.
How do you make horseradish less strong?
Add the vinegar right after grinding, and use a little extra vinegar and a pinch of sugar. You can also blend in a piece of cooked beet or fold the horseradish into sour cream or mayonnaise. The heat also softens naturally after a day or two in the fridge.
Do you have to peel horseradish?
Yes, it’s best to peel it. The outer skin is tough and bitter, and it can make your finished horseradish taste harsh. Scrub the root, then use a vegetable peeler or paring knife to remove the skin and any brown or dark patches.
Printable Recipe Card
Homemade Horseradish
A sharp, fresh-tasting condiment made from just three ingredients. Adjust the heat to your liking by changing when you add the vinegar.
| Prep time | 10 minutes |
| Total time | 10 minutes (plus optional resting time) |
| Yield | About 1 cup (one small jar) |
| Course | Condiment |
| Cuisine | American / Eastern European |
| Diet | Vegan, gluten-free |
Ingredients
- ½ pound fresh horseradish root, peeled and cut into ½-inch chunks
- 6 to 7 tablespoons white vinegar, adjusted as needed
- ½ teaspoon salt
- 1 to 2 tablespoons cold water (optional, only if needed)
Equipment
- Vegetable peeler
- Food processor, blender, or box grater
- Clean glass jar with a tight-fitting lid
- Rubber spatula
Instructions
- Prep the root: Scrub, peel, and trim the horseradish, then cut it into small chunks.
- Grind: Pulse in a food processor until finely minced, adding a tablespoon of cold water if needed. Let it settle for 30 to 60 seconds before opening the lid, and keep your face turned away.
- Add the vinegar: For mild horseradish, add it right away. For hot, wait 2 to 3 minutes.
- Season and blend: Add the salt and vinegar, starting with about 4 tablespoons. Pulse until combined, adding more vinegar a spoonful at a time until moist but not soupy.
- Adjust the texture: Pulse longer for a smooth result, or less for a chunky one.
- Jar and chill: Transfer to a glass jar, press down gently, seal, and refrigerate.
Notes
- Heat level: Vinegar immediately = mild. After 1 to 2 minutes = medium. After 3 to 5 minutes = hot.
- Storage: Refrigerate for up to 4 to 6 weeks for the best flavor. It can be frozen in small portions for 3 to 6 months.
- Too wet? Drain off the excess liquid before using.
- Ventilation: Work in a well-ventilated area, and wear eye protection if you have it.
- Tip: The flavor mellows slightly after a few hours, so it’s even better the next day.
Recipe Schema Markup (for your developer or SEO plugin)
Most recipe plugins (such as WP Recipe Maker or Tasty Recipes) add Recipe schema automatically when you enter these fields. If you’re using plain HTML, I can write the JSON-LD for you.
Conclusion
Learning how to make horseradish at home turns out to be one of the easiest kitchen projects you can try. With a fresh root, a little vinegar, and a pinch of salt, you can have a jar of bold, flavorful horseradish in about 10 minutes, and it will taste far sharper than anything on a supermarket shelf.
To recap the key points:
- Choose a firm, fresh root with no soft spots or sprouting.
- Ventilate your space and protect your eyes while grinding.
- Control the heat with timing: add the vinegar right away for mild, or wait a few minutes for hot.
- Store it in a sealed glass jar in the fridge, and make small batches for the strongest flavor.
Once you have a jar ready, put it to work on prime rib, roast beef sandwiches, deviled eggs, or a homemade bloody mary.
Now it’s your turn. How hot do you like your horseradish: mild, medium, or sinus-clearing? Leave a comment below and tell us how your batch turned out. If you enjoyed this guide, share it with a friend who loves a little heat, and don’t forget to rate the recipe.
Related reading (suggested internal links):
- Creamy horseradish sauce for prime rib
- Homemade cocktail sauce
- The perfect bloody mary
- How to grow horseradish in your garden